tectrack.net
  • Home
  • Cloud
    • AWS
    • Google Cloud
  • Virtualization
    • VMWare
  • Containers
    • Kubernetes
  • Other
No Result
View All Result
tectrack.net
  • Home
  • Cloud
    • AWS
    • Google Cloud
  • Virtualization
    • VMWare
  • Containers
    • Kubernetes
  • Other
No Result
View All Result
tectrack.net
No Result
View All Result

Cross vCenter VM Migration Using xVMotion Tool | Step by Step Guide

Geeth Nuwan by Geeth Nuwan
March 30, 2023
in VMWare, How To, Virtualization
Reading Time: 4 mins read
504 15
A A
0
Cross vCenter VM Migration Using xVMotion Tool | Step by Step Guide
Share on FacebookShare on TwitterShare on LinkedIn

VMWare has introduced a fling to migrate VMs between two vCenters graphically.

What is Cross vCenter Workload Migration Utility (xVMotion)

VMWare cross Center migrations utility allows you to easily migrate running virtual machines as bulks from one Center to another Center. The best thing is it’s powered with a graphical user interface and using that you can migrate VMs between vCenter servers without having any downtime.

Requirements for Cross vCenter Workload Migration Utility

  • vCenter Server 6.0 Update 3 or above (ESXi hosts must also be 6.0u3+)
  • Java Runtime Environment 1.8-10
  • Web Browser
Please refer following KB for more details on supported vCenter versions, compatibility, etc.
https://kb.vmware.com/s/article/2106952

How to download VMWare Cross vCenter VM Migration Tool

You can download the tool from the below link. It will download a .jar file and please note that you have to install the Java Runtime Environment to run this file.
https://flings.vmware.com/cross-vcenter-workload-migration-utility

How to Install VMWare Cross vCenter VM Migration Utility

  • Download the file from the above link
  • Open Command prompt/PowerShell as administrator.
  • Navigate to the location where .jar file is located.
  • Run the file using java command.

   cd xvmotion    java -jar xvm-3.1.jar


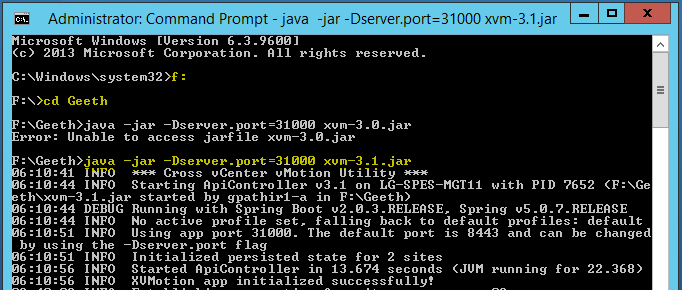
If you want to change the port id, use the below command and specify the port

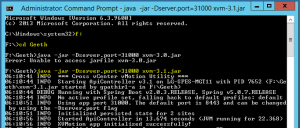
java -jar -Dserver.port=31000 xvm-3.1.jar

 
Then the jar file will start and it will initialize the program. Do not close the command prompt. 
 
VMWare 2BCross 2BvCenter 2BVM 2BMigration 2BTool 2B1 -
 
I am using port 31000. If you have not specified the port when you start the app, the default port is 8443.
 
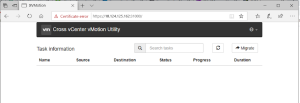
Next, open your web browser and open the application using the IP address of your server (maybe the VM this jar file is running)
 

HTTP://10.124.125.162:31000

 
Please use the port as you specified. This will open the interface of VMWare Cross vCenter VM Migration Utility.
 
VMWare 2BCross 2BvCenter 2BVM 2BMigration 2BTool 2B2 -
 

How to add vCenters to VMWare Cross vCenter VM Migration Utility?


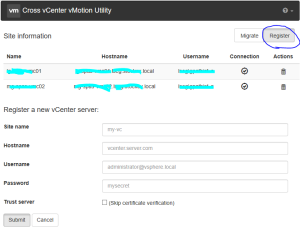
Click on the Migrate button of the GUI and click Register Button. Under “Register a new vCenter server” section you can enter your VCenter details here and add both source and destination vCenters to here.

 
vmware 2Bxvmotion 2Btool 2Badd 2Bvcenter -
 

How to Start Cross Migration Utility?

In Cross vCenter Workload Migration Utility GUI and click Migrate Button. You will see you can select the source and destination vCenters, datacenters, clusters, networks, datastore, etc. Select them accordingly and start the migration.

-

VMWare has introduced a fling to migrate VMs between two vCenters graphically.

What is Cross vCenter Workload Migration Utility (xVMotion)

VMWare cross Center migrations utility allows you to easily migrate running virtual machines as bulks from one Center to another Center. The best thing is it’s powered with a graphical user interface and using that you can migrate VMs between vCenter servers without having any downtime.

Requirements for Cross vCenter Workload Migration Utility

  • vCenter Server 6.0 Update 3 or above (ESXi hosts must also be 6.0u3+)
  • Java Runtime Environment 1.8-10
  • Web Browser
Please refer following KB for more details on supported vCenter versions, compatibility, etc.
https://kb.vmware.com/s/article/2106952

How to download VMWare Cross vCenter VM Migration Tool

You can download the tool from the below link. It will download a .jar file and please note that you have to install the Java Runtime Environment to run this file.
https://flings.vmware.com/cross-vcenter-workload-migration-utility

How to Install VMWare Cross vCenter VM Migration Utility

  • Download the file from the above link
  • Open Command prompt/PowerShell as administrator.
  • Navigate to the location where .jar file is located.
  • Run the file using java command.

   cd xvmotion    java -jar xvm-3.1.jar


If you want to change the port id, use the below command and specify the port

java -jar -Dserver.port=31000 xvm-3.1.jar

 
Then the jar file will start and it will initialize the program. Do not close the command prompt. 
 
VMWare 2BCross 2BvCenter 2BVM 2BMigration 2BTool 2B1 -
 
I am using port 31000. If you have not specified the port when you start the app, the default port is 8443.
 
Next, open your web browser and open the application using the IP address of your server (maybe the VM this jar file is running)
 

HTTP://10.124.125.162:31000

 
Please use the port as you specified. This will open the interface of VMWare Cross vCenter VM Migration Utility.
 
VMWare 2BCross 2BvCenter 2BVM 2BMigration 2BTool 2B2 -
 

How to add vCenters to VMWare Cross vCenter VM Migration Utility?


Click on the Migrate button of the GUI and click Register Button. Under “Register a new vCenter server” section you can enter your VCenter details here and add both source and destination vCenters to here.
 
vmware 2Bxvmotion 2Btool 2Badd 2Bvcenter -
 

How to Start Cross Migration Utility?

In Cross vCenter Workload Migration Utility GUI and click Migrate Button. You will see you can select the source and destination vCenters, datacenters, clusters, networks, datastore, etc. Select them accordingly and start the migration.

You might also like

How to Fix ESXi “MetadataDownloadError Could not download from depot” Error during Upgrades/Patching.

How to Fix “MetadataDownloadError Could not download from depot” Error when Upgrades/Patching VMWare ESXi.

July 11, 2023
How to Point Cloudflare Registered Domain Name to your Web Hosting / cPanel account

How to Point Cloudflare Registered Domain Name to your Web Hosting / cPanel account

June 28, 2023

VMWare has introduced a fling to migrate VMs between two vCenters graphically.

What is Cross vCenter Workload Migration Utility (xVMotion)

VMWare cross Center migrations utility allows you to easily migrate running virtual machines as bulks from one Center to another Center. The best thing is it’s powered with a graphical user interface and using that you can migrate VMs between vCenter servers without having any downtime.

Requirements for Cross vCenter Workload Migration Utility

  • vCenter Server 6.0 Update 3 or above (ESXi hosts must also be 6.0u3+)
  • Java Runtime Environment 1.8-10
  • Web Browser
Please refer following KB for more details on supported vCenter versions, compatibility, etc.
https://kb.vmware.com/s/article/2106952

How to download VMWare Cross vCenter VM Migration Tool

You can download the tool from the below link. It will download a .jar file and please note that you have to install the Java Runtime Environment to run this file.
https://flings.vmware.com/cross-vcenter-workload-migration-utility

How to Install VMWare Cross vCenter VM Migration Utility

  • Download the file from the above link
  • Open Command prompt/PowerShell as administrator.
  • Navigate to the location where .jar file is located.
  • Run the file using java command.

   cd xvmotion    java -jar xvm-3.1.jar


If you want to change the port id, use the below command and specify the port

java -jar -Dserver.port=31000 xvm-3.1.jar

 
Then the jar file will start and it will initialize the program. Do not close the command prompt. 
 
VMWare 2BCross 2BvCenter 2BVM 2BMigration 2BTool 2B1 -
 
I am using port 31000. If you have not specified the port when you start the app, the default port is 8443.
 
Next, open your web browser and open the application using the IP address of your server (maybe the VM this jar file is running)
 

HTTP://10.124.125.162:31000

 
Please use the port as you specified. This will open the interface of VMWare Cross vCenter VM Migration Utility.
 
VMWare 2BCross 2BvCenter 2BVM 2BMigration 2BTool 2B2 -
 

How to add vCenters to VMWare Cross vCenter VM Migration Utility?


Click on the Migrate button of the GUI and click Register Button. Under “Register a new vCenter server” section you can enter your VCenter details here and add both source and destination vCenters to here.
 
vmware 2Bxvmotion 2Btool 2Badd 2Bvcenter -
 

How to Start Cross Migration Utility?

In Cross vCenter Workload Migration Utility GUI and click Migrate Button. You will see you can select the source and destination vCenters, datacenters, clusters, networks, datastore, etc. Select them accordingly and start the migration.

-

VMWare has introduced a fling to migrate VMs between two vCenters graphically.

What is Cross vCenter Workload Migration Utility (xVMotion)

VMWare cross Center migrations utility allows you to easily migrate running virtual machines as bulks from one Center to another Center. The best thing is it’s powered with a graphical user interface and using that you can migrate VMs between vCenter servers without having any downtime.

Requirements for Cross vCenter Workload Migration Utility

  • vCenter Server 6.0 Update 3 or above (ESXi hosts must also be 6.0u3+)
  • Java Runtime Environment 1.8-10
  • Web Browser
Please refer following KB for more details on supported vCenter versions, compatibility, etc.
https://kb.vmware.com/s/article/2106952

How to download VMWare Cross vCenter VM Migration Tool

You can download the tool from the below link. It will download a .jar file and please note that you have to install the Java Runtime Environment to run this file.
https://flings.vmware.com/cross-vcenter-workload-migration-utility

How to Install VMWare Cross vCenter VM Migration Utility

  • Download the file from the above link
  • Open Command prompt/PowerShell as administrator.
  • Navigate to the location where .jar file is located.
  • Run the file using java command.

   cd xvmotion    java -jar xvm-3.1.jar


If you want to change the port id, use the below command and specify the port

java -jar -Dserver.port=31000 xvm-3.1.jar

 
Then the jar file will start and it will initialize the program. Do not close the command prompt. 
 
VMWare 2BCross 2BvCenter 2BVM 2BMigration 2BTool 2B1 -
 
I am using port 31000. If you have not specified the port when you start the app, the default port is 8443.
 
Next, open your web browser and open the application using the IP address of your server (maybe the VM this jar file is running)
 

HTTP://10.124.125.162:31000

 
Please use the port as you specified. This will open the interface of VMWare Cross vCenter VM Migration Utility.
 
VMWare 2BCross 2BvCenter 2BVM 2BMigration 2BTool 2B2 -
 

How to add vCenters to VMWare Cross vCenter VM Migration Utility?


Click on the Migrate button of the GUI and click Register Button. Under “Register a new vCenter server” section you can enter your VCenter details here and add both source and destination vCenters to here.
 
vmware 2Bxvmotion 2Btool 2Badd 2Bvcenter -
 

How to Start Cross Migration Utility?

In Cross vCenter Workload Migration Utility GUI and click Migrate Button. You will see you can select the source and destination vCenters, datacenters, clusters, networks, datastore, etc. Select them accordingly and start the migration.

Tags: FlingsMigrationvCenter
Share288Tweet180Pin65Share50
Geeth Nuwan

Geeth Nuwan

I am a Systems Engineer by profession. Also enthusiastic IT professional specializing in Virtualization, Cloud technologies and enterprise infrastructure.

Related Stories

How to Fix ESXi “MetadataDownloadError Could not download from depot” Error during Upgrades/Patching.

How to Fix “MetadataDownloadError Could not download from depot” Error when Upgrades/Patching VMWare ESXi.

by Geeth Nuwan
July 11, 2023
1

Upgrading VMware ESXi is a critical task in maintaining a virtualized environment. However, sometimes errors can occur during the upgrade...

How to Point Cloudflare Registered Domain Name to your Web Hosting / cPanel account

How to Point Cloudflare Registered Domain Name to your Web Hosting / cPanel account

by Geeth Nuwan
June 28, 2023
0

Cloudflare provides various internet security and performance services, including content delivery networks (CDNs) and DDoS mitigation. Recently they introduced their...

[Fixed] Raw Device Mapping (RDM) Missing from a Windows VM

[Fixed] Raw Device Mapping (RDM) Missing from a Windows VM

by Geeth Nuwan
March 30, 2023
0

Image from - http://www.electricmonk.org.uk/2012/03/02/vmware-rdms/ Raw device mapping (RDM) is a method to provide direct access to a LUN on an...

List Portgroups and IP address of VMs using PowerCLI

List Portgroups and IP address of VMs using PowerCLI

by Geeth Nuwan
July 16, 2023
1

For official work, I wanted to print out a list of all the VMs and their associated network/portgroups and IP...

Leave a Reply Cancel reply

Your email address will not be published. Required fields are marked *

Recommended

How I Passed LFCS (Linux Foundation Certified System Administrator). 10 Tips and Tricks to Pass LFCS

How I Passed LFCS (Linux Foundation Certified System Administrator). 10 Tips and Tricks to Pass LFCS

July 12, 2023
Kubernetes Basic Concepts for Beginners

Kubernetes Basic Concepts, Beginner’s Walkthrough

July 10, 2023

Popular Story

  • How to Fix ESXi “MetadataDownloadError Could not download from depot” Error during Upgrades/Patching.

    How to Fix “MetadataDownloadError Could not download from depot” Error when Upgrades/Patching VMWare ESXi.

    1441 shares
    Share 576 Tweet 360
  • How I Passed LFCS (Linux Foundation Certified System Administrator). 10 Tips and Tricks to Pass LFCS

    814 shares
    Share 324 Tweet 203
  • Cross vCenter VM Migration Using xVMotion Tool | Step by Step Guide

    719 shares
    Share 288 Tweet 180
  • How to Point Cloudflare Registered Domain Name to your Web Hosting / cPanel account

    638 shares
    Share 255 Tweet 160
  • List Portgroups and IP address of VMs using PowerCLI

    634 shares
    Share 254 Tweet 159

Expert insights from Virtualization to cloud-native technologies

Categories

  • Certifications
  • Containers
  • How To
  • Kubernetes
  • Linux
  • PowerCLI
  • Scripting
  • Storage
  • Virtualization
  • VMWare

Pages

  • About
  • Contact
  • Home
  • Privacy Policy

The views and comments expressed anywhere on this site are strictly mine and not the opinions and views of my employer. [more]
  • Sponsor
  • Terms and Conditions
  • Privacy Policy
  • Contact Us

© 2023 tectrack.net

No Result
View All Result
  • About
  • Contact
  • Become Sponsor
  • Privacy Policy
  • Disclaimer

© 2023 tectrack.net

Welcome Back!

Login to your account below

Forgotten Password?

Retrieve your password

Please enter your username or email address to reset your password.

Log In
This website uses cookies. By continuing to use this website you are giving consent to cookies being used. Visit our Privacy and Cookie Policy.